How can exposure compensation help us to take better pictures?
Modern cameras have a unique ability to read the light and determine the correct exposure for most situations. However, there are still situations where the photographer’s intervention is decisive for creative or technical reasons. For this, exposure compensation is a fundamental and easy-to-use tool. All that is needed is to understand how it works.
What is exposure compensation?
As the name implies, exposure compensation is the act of changing the exposure values calculated by the camera to get an image that is correctly exposed or at least exposed according to our objectives.
Many cameras have an exposure compensation function intended to make the process easier whenever an automatic or semiautomatic exposure mode is used. In general, it is a scale with zero as the central point and allows you to change the exposure to + or – up to 2 or 3 stops. This allows the photographer to change the camera’s exposure settings to obtain darker or lighter images according to his needs without using the Manual mode.
How to compensate exposure
Modern cameras generally have a built-in light meter that can read the light reflected from the scene being photographed. The camera uses this reading to set the exposure values according to the exposure mode selected by the photographer.
This meter, by reading the light reflected by the scene, will not always recognize a very dark or very bright scene and will tend to darken images where bright tones predominate, or to lighten images where dark tones dominate.
With exposure compensation we will be able to compensate for this error easily and intuitively.
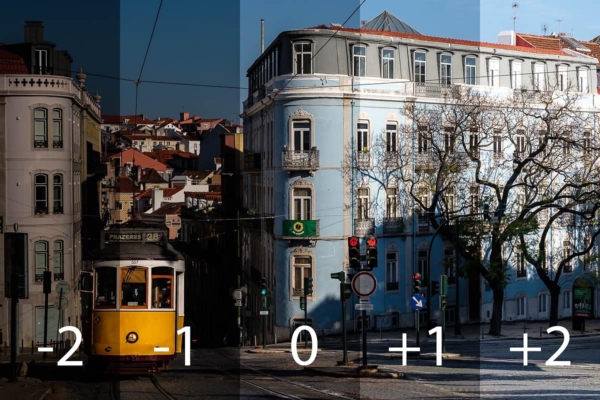
Ideally = 0 (camera reading)

+1, +2, etc. we get a lighter image (overexposed)

-1, -2, etc. we get a darker image (underexposed)
To master this technique, it is essential to analyze the scene to be photographed in advance and determine the dominant brightness. If it is a typically dark scene, we may have to use negative compensation and the opposite for a bright scene where the highlights dominate.
Very importantly, don’t forget to reset the compensation to 0 right after you shoot so that it doesn’t get forgotten and affects the following images.
With modern mirrorless cameras, the process is much easier because it is easy to predict the exposure on the camera before shooting. To others, it is a matter of experimentation.
With some training, the photographer can anticipate without difficulty what compensation is needed.
Knowing your camera’s light meter to foresee how it will react to a specific situation is a significant help.
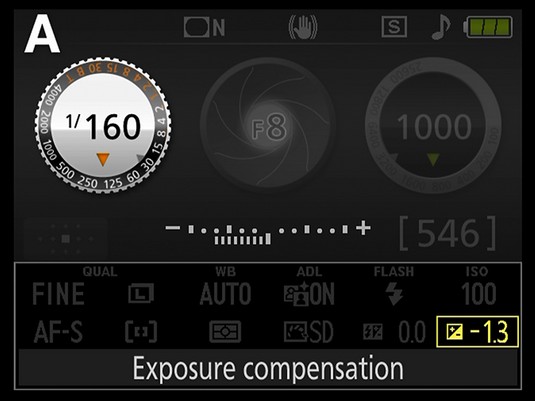
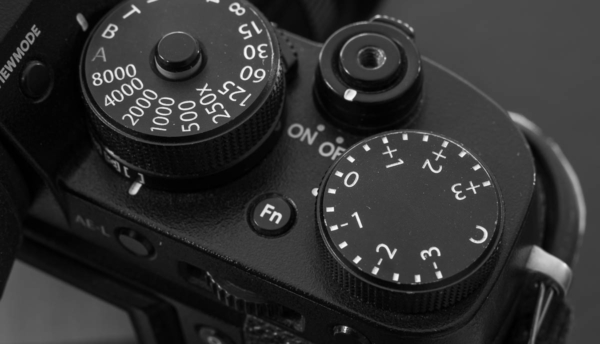
Where can we find the exposure compensation in the camera?
Unfortunately, there is no single answer to this question as the location varies from brand to brand.
On some brands, we may have a button with a +/- sign that, when pressed, gives access to the compensation that is varied by turning a dial and controlled by a scale available on one of the camera’s external displays. There is a round selector normally placed at the top of the camera on one side or the other on other brands. The photographer only has to turn it in to select the desired value. If your camera is different or if you can’t find it, reading the chapter on the subject in your camera manual will give you all the specific information for the brand/model.
Exposure compensation and exposure modes
Depending on the exposure mode we use when shooting, the exposure compensation will change different parameters. Let’s look at each case individually.
Manual (M)
In Manual or M, exposure compensation does not work. Manual mode gives the photographer absolute control overexposure. The exposure compensation is set by applying the desired shutter speed and aperture values on the respective dials. If ISO is set to Auto, in some cameras, the exposure compensation will work.
Aperture priority (A or Av)
When you use exposure compensation in aperture priority mode, A or Av, the shutter speed value will vary. The ISO value only varies if set to AUTO.
The aperture set by the photographer remains fixed.
Shutter priority (S or Tv)
In shutter speed priority mode, S or Tv, the aperture value will change when you use exposure compensation. The ISO value only varies if set to AUTO.
The shutter speed set by the photographer remains fixed.
Program (P)
In Program, or P mode, both the shutter speed and aperture values will vary according to the mode settings when you use exposure compensation. The ISO value will only vary if set to AUTO.
Finally, exposure compensation on an iPhone
On the iPhone, it is also possible to use exposure compensation. To do this, tap the screen once to activate the focus point. The square that marks the focus point has an associated light measurement area. With the square active, slide your finger vertically across the screen to change the exposure.
There are no values, but the result is immediately visible on the screen.
On newer models such as iPhone 11 and later, you can use Exposure Compensation Control to precisely set and lock the exposure for upcoming shots. To access it, tap the arrow, tap the exposure compensation icon +/- and adjust your exposure level. The exposure locks until the next time you open the Camera app.
Now that you know how it works, the best thing is to start practicing. If you have any questions, please, contact me.